Iter 0: Getting Started
Iteration 0—Getting Started: Individual Setup
All but the last step of this setup process should be done by each member of the team to get the app running in their local environment and ready for development. The last step is only done once, on the team’s shared repo.
- Because this project makes nontrivial use of JavaScript, ensure the correct versions of Node.js and the npm package manager for JavaScript are installed.
- Like all nontrivial apps, this one depends on libraries–both Ruby libraries (“gems”) and JavaScript libraries (“packages”). You will use
bundleto install Ruby dependencies as usual, andnpmto install JavaScript package dependencies
- Create and seed the Rails database by running the initial migration.
- Check the configuration of our provided linters —programs that check your source code for common errors and potential issues related to coding style. These are run when you add or modify code to the codebase and serve as an early warning that you need to fix stuff.
- Setup credentials management. The maps API used by the app requires API keys, and these should be stored in a secure way that makes them available to each developer, to Heroku for deployment, and to the CI environment in the team’s shared repo.
- Finally, in the team’s shared repo, setup continuous integration (CI) so that tests run each time you push code. Note that this is in addition to each developer regularly running tests as they develop. Particularly after merges of pull requests, CI provides a clear layer of confidence that you haven’t broken something.
Ready? Here goes.
Get the Code
Starter Code Repo
The started repo is saasbook/hw-agile-iterations on GitHub. If you are working individually, or doing the assignment on your own, you should first make your own copy, then clone that repo.
e.g.
# Replace with your own repo:
git clone git@github.com:saasbook/hw-agile-iterations.git actionmap
Initial Setup (Do now)
Similarly to previous CHIPS, your team has been added to a fa25-chips-10.5-<xx> repo where the <xx> is replaced by your team’s number. What’s different this time around is that instead of only one member being in charge of making PRs to the repo, you will all be responsible for maintaining the repo together. Start by cloning in the repo using:
git clone git@github.com:cs169/fa25-chips-10.5-<xx>.git actionmap
You may notice, this is an empty repo. Uh, oh! Let’s add an upstream remote to fetch the starter code. Having an upstream remote in git allows us to easily pull in code from a “parent” like repository in case it changes.
cd actionmap
git remote add upstream git@github.com:saasbook/hw-agile-iterations.git
Note: This step adds the remote only to your local checkout. Each team member will want to have an upstream remote if they want to pull in changes.
Now, let’s sync the changes and push them to our team’s repository. This only needs to be done once per team.
cd actionmap
git status
# verify you are on main and it is empty.
git checkout
git fetch upstream
git pull upstream/main
git push origin main
Ideally, we’d make a separate branch, then a pull request, then merge that branch. However, for the very first commit, whatever branch we push to GitHub becomes the ‘default’ one.
Commit frequently (For future reference)
You will now have a local branch to make your edits on that is connected to an identically named remote branch on the GitHub repo to which you should push frequently using the following commands:
git status # review your changes
git add [...] # you will need to include your own files!
git commit -m "your message here"
git push origin
PR once you’ve finished your part (For future reference)
Once you’ve finished a story or feature, it’s time to get your changes on the main branch of your GitHub repo through a Pull Request (PR). This can be done directly through the GitHub site by clicking the “X branches” button near the top of the repo page.

From here, find your branch and click New pull request.
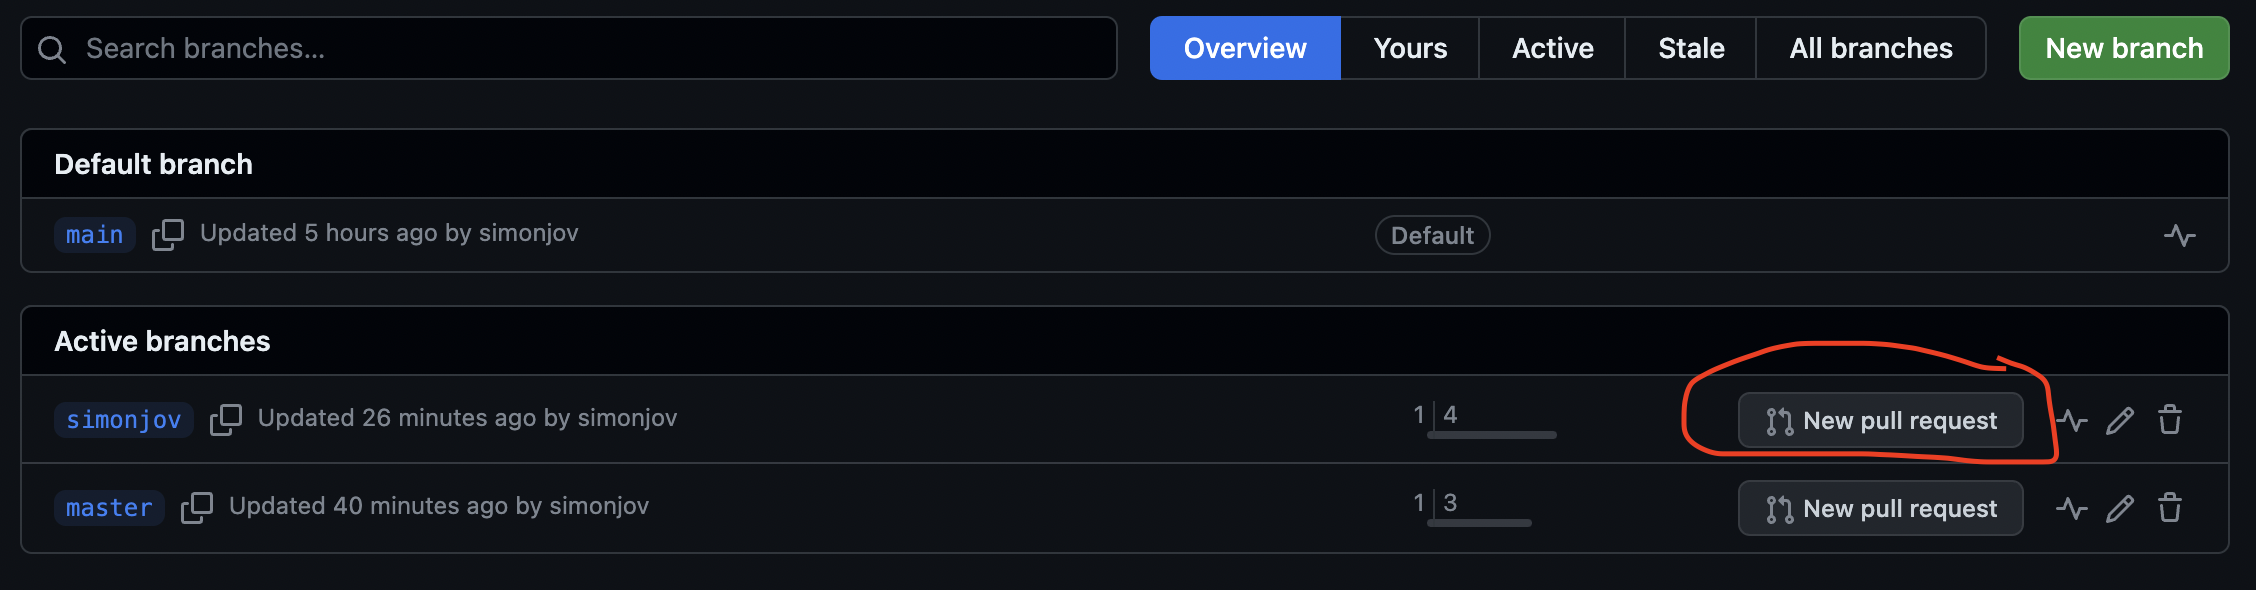
Now make sure that the base branch is main and that the compare branch is your own. Then add a title and a description of the changes you’ve made as well as any other info that you’d like your team to know about your PR. Once you create the PR, let your teammates know so that they can check out the changes and approve the PR.
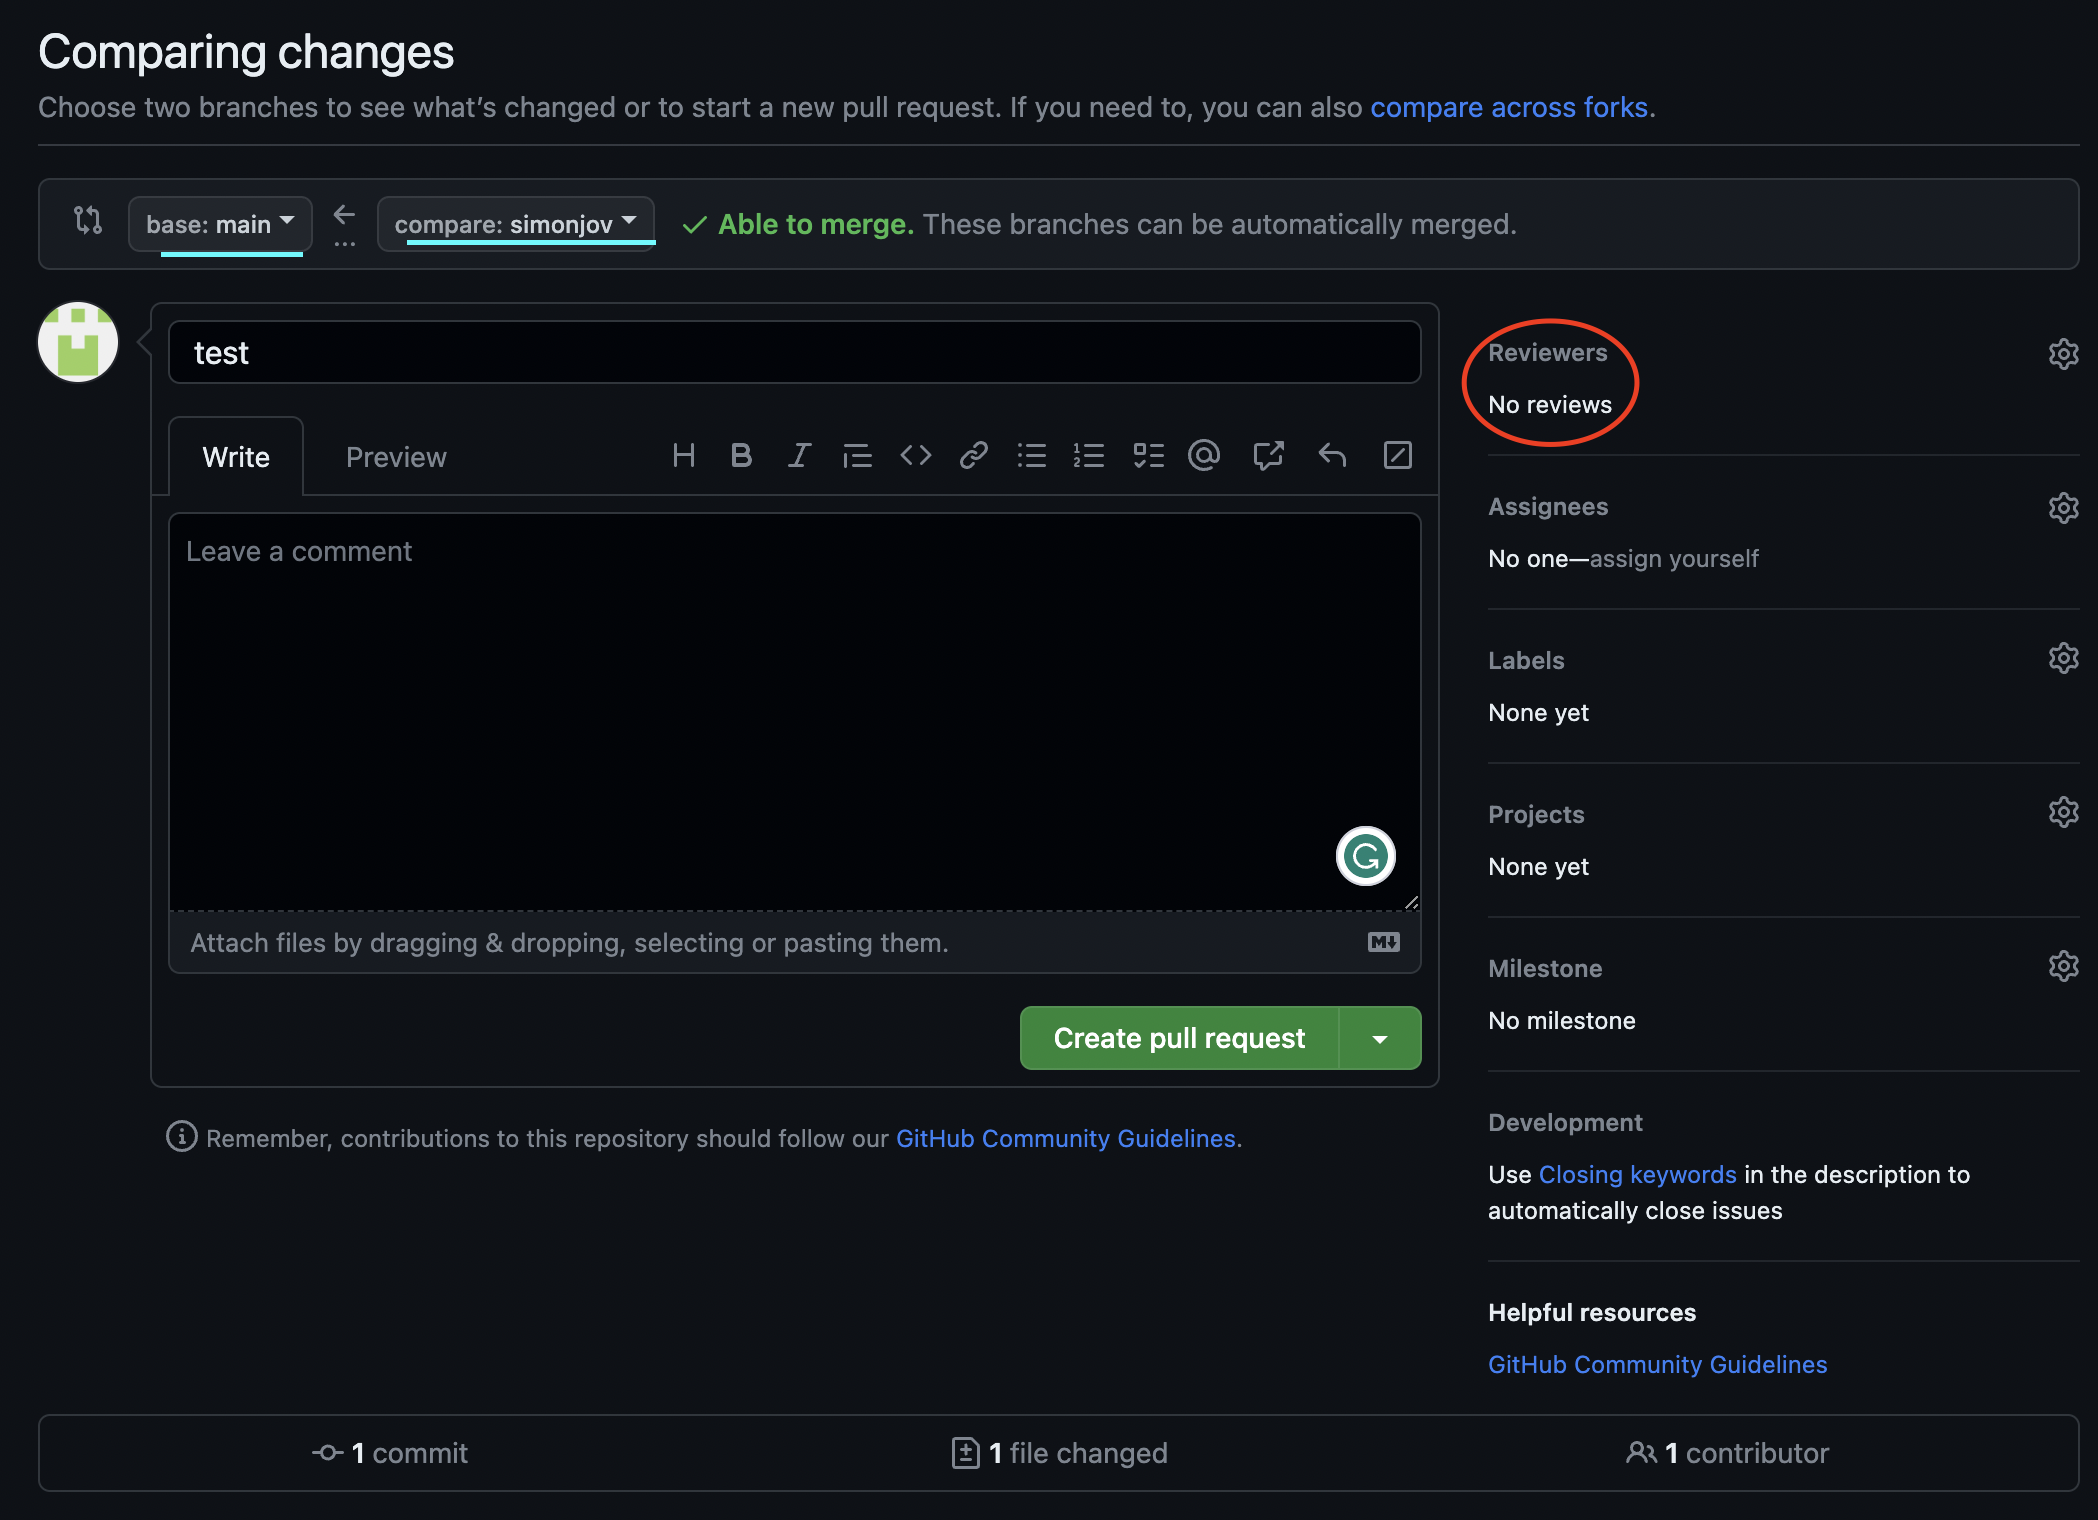
Protocols vary from team to team, but in general, it is good practice to have at least 1 or 2 teammates review your changes to ensure that no bugs creep through to the merge. Once the reviews are in, all comments addressed, and any potential merge conflicts are resolved, you can merge in your changes!
A New Set of (JavaScript) Tools
ActionMap makes use of quite a bit of JavaScript. While you won’t be writing much JS, we do need to make sure our system can complie and execute JavaScript.
The Codio stack for this assignment comes with the following already installed, but if you’re not using Codio, you will need to install these yourself:
- nodejs (version 22 or higher)
nodeis a server-side JavaScript environment.
- npm
npmis the package manager for JavaScript (just likegemandbundler)- Install packages by running
npm install, just likebundle install - Run commands by running
npm run [command](similar tobundle exec [command])
- mise (https://mise.jdx.dev/walkthrough.html)
- mise is a tool which makes it very easy to manage different version of programming languages.
mise use nodeto use the latest version, ormise use node@22to use a specific version.
Install dependencies in your local environment
Now you can install the gems, and as usual, for local development, we recommend you skip installing production dependencies:
cd actionmap
bundle config set without production
bundle install
If not using Codio, this step may take a while since some of the gems include Ruby extensions written in C that must be compiled as they are installed.
Note: Because there are gems which use native compiled code, you may need additional build tools installed, like cmake. In Codio, these utilities should come preinstalled in your container. If you’re working on your own system, you may need to install these tools.
Some dependencies for both Debian (Ubuntu), and macOS:
# Debian / apt systems:
sudo apt install libgit2-dev cmake pkg-config
# macOS via homebrew
brew install cmake pkg-config
If you receive an installation error during bundle install, read the entire message carefully. It should reference what dependencies are missing. Version and dependency management are on of the trickier parts of building software.
In the package.json, ensure you have a minimum version of node specified.
"node": "> 20.x",
Next we install the JavaScript libraries used by Node. Node projects have a package.json file that is analogous to the Gemfile, and running npm produces package-lock.json, analogous to Gemfile.lock.
node -v
mise use node@22 # If your node version is < 22
npm install
Setup and seed the database
The app is almost ready for launch. You need to run database migrations in db/schema.rb to prepare your local database to store and serve data, and add the seed data to it:
bundle exec rails db:prepare
Rails’ db:prepare task will create the database if necessary, then apply the schema.rb file. This is usually faster and more reliable than rerunning the migrations. It also tries to be helpful and load the seeds file if necessary. Go ahead and inspect db/seeds.rb to see what data is loaded.
(Note: what kind of data is in db:seed? Do you agree this is a good use of the seed file?)
Launch the app!
We’re ready to run the app!
Normally, we would run the app using
bundle exec rails server -b 0.0.0.0
However, in this case, a downside of this option is that JavaScript-related changes may not be visible right after you make them. Essentially, when you change Rails app files, Rails knows to “reload” any changed Ruby classes on the very next request to your app; but because we’re doing separate JavaScript package management with npm, the same isn’t true for JavaScript, CSS, or other front-end files.
Instead, we recommend you use a slightly different command:
bin/dev
What does this do? Essentially, it just runs foreman start -f Procfile.dev.
We’ve seen a Procfile before, which is what Heroku uses to start our application. foreman (and similar tools) manage Procfiles locally for us. In this case, our Procfile.dev includes three different procs (processes). In addition to our standard Rails server, we will use node to automatically compile both CSS and JavaScript files in the background.
foreman start -f Procfile.dev
Using Linters
A linter is a program that analyzes source code for common errors and conformance to a coding style. The original lint program was written in C and checked C source code; today the term “linter” has come to be generalized to any program that does this task for a particular language or framework.
We have installed three linters in this project.
- rubocop checks Ruby code for common errors and stylistic problems; we provide a default configuration file .rubocop.yml telling it what to check for.
- eslint similarly uses .eslintrc.js to check for common errors and stylistic problems in JavaScript.
- Finally, haml-lint finds potential problems with Haml, a very compact markup language that generates HTML. This project uses
html.hamlfiles inapp/viewsrather than.html.erb, because Haml is supported by more programming languages (including Java, JavaScript and PHP) and frameworks, whereas.erbis specific to Ruby. This makes it easier for non-Ruby developers to work with the codebase. .haml-lint.yml is its configuration file.
You can manually run these linters:
bundle exec rubocop
npm run lint
bundle exec haml-lint
If you add a -a option to rubocop, or haml-lint or run lint:fix instead of lint, those linters will automatically fix common errors for you.
bundle exec rubocop -a # Look up the docs for -A
bundle exec haml-lint -a
npm run lint:fix
(For npm run, note that in package.json you can see that lint and lint:fix are entries in JSON path $.scripts.lint and $.scripts.lint:fix that invoke our “vendored” install of eslint, the actual underlying program.)
We have included tests that will automatically run the linter checks in spec/linters and in the GitHub Actions workflow that runs on each push.
The next steps involve creating credentials and setting up CI and issues, which you should do as a team.