Part 0: Demystifying SaaS app creation
CHIP 3.7: Wordguesser
Goal: Understand the steps needed to create, version, and deploy a SaaS app, including tracking the libraries it depends on so that your production and development environments are as similar as possible.
What you will do: Create a simple “hello world” app using the Sinatra framework, version it properly, and deploy it to Render.
Creating and versioning a simple SaaS app
SaaS apps are developed on your computer but deployed to production on a server that others can access. We try to minimize the differences between the development and production environments, to avoid difficult-to-diagnose problems in which something works one way on your development computer but a different way (or not at all) when that code is deployed to production.
We have two mechanisms for keeping the development and production environments consistent. The first is version control, such as Git, for the app’s code. But since almost all apps also rely on libraries written by others, such as gems in the case of Ruby, we need a way to keep track of which versions of which libraries our app has been tested with, so that the same ones are used in development and production.
Happily, Ruby has a wonderful system for managing gem dependencies: a gem called Bundler looks for a file called Gemfile in the app root directory of each project. The Gemfile contains a list of gems and versions your app depends on. Bundler verifies that those gems, and any others that they in turn depend on, are properly installed on your system and accessible to the app.
Let’s start with the following steps:
-
Create a new empty directory to hold your new app, and use
git initin that directory to start versioning it with Git. -
In that directory, create a new file called
Gemfile(the capitalization is important) with the following contents. This file will be a permanent part of your app and will travel with your app anywhere it goes:
source 'https://rubygems.org'
ruby '3.3.8'

gem 'sinatra', '~> 4.1'
gem 'puma',    '~> 6.6'
gem 'rackup',  '~> 2.2.1'
The first line says that the preferred place to download any necessary gems is https://rubygems.org, which is where the Ruby community registers “production ready” gems.
The second line specifies which version of the Ruby language interpreter is required. If we omitted this line, Bundler wouldn’t try to verify which version of Ruby is available; there are subtle differences between the versions, and not all gems work with all versions, so it’s best to specify this.
The last line says we need version 2.0.1 or later of the sinatra gem. In some cases we don’t need to specify which version of a gem we want; in this case we do specify it because we rely on some features that are absent from earlier versions of Sinatra.
Run Bundler
Run the command bundle, which examines your Gemfile to make sure the correct gems (and, where specified, the correct versions) are available, and tries to install them otherwise. This will create a new file Gemfile.lock, which you should place under version control.
To place under version control, use these commands:
$ git add .
$ git commit -m "Set up the Gemfile"
The first command stages all changed files for committing. The second command commits the staged files with the comment in the quotes. You can repeat these commands to commit future changes. Remember that these are LOCAL commits – if you want these changes on GitHub, you’ll need to do a git push command, which we will show later.
Self Check Questions (click triangle to check your answer)
What's the difference between the purpose and contents of Gemfile and Gemfile.lock? Which file is needed to completely reproduce the development environment's gems in the production environment?
Gemfilespecifies the gems you need and in some cases the constraints on which version(s) are acceptable.Gemfile.lockrecords the actual versions found, not only of the gems you specified explicitly but also any other gems on which they depend, so it is the file used by the production environment to reproduce the gems available in the development environment.
After running bundle, why are there gems listed in Gemfile.lock
that were not listed in Gemfile?
Bundler looked up the information for each Gem you requested (in this case, onlysinatra) and realized that it depends on other gems, which in turn depend on still others, so it recursively installed all those dependencies. For example, therackappserver is a gem, and while you didn't explicitly request it,sinatradepends on it. This is an example of the power of automation: rather than requiring you (the app developer) to understand every Gem dependency, Bundler automates that process and lets you focus only on your app's top-level dependencies.
Create a simple SaaS app with Sinatra
As Chapter 2 of ESaaS explains, SaaS apps require a web server to receive HTTP requests from the outside world, and an application server that “connects” your app’s logic to the web server. For development, we will use webrick, a very simple Ruby-based web server that would be inappropriate for production but is fine for development. In both development and production, we will use the rack Ruby-based application server, which supports Ruby apps written in various frameworks including Sinatra and Rails.
As Chapter 2 of ESaaS explains, a SaaS app essentially recognizes and responds to HTTP requests corresponding to the application’s routes (recall that a route consists of an HTTP method such as GET or POST plus a URI). Sinatra provides an extremely lightweight shorthand for matching a route with the app code to be executed when a request using that route arrives from the Web server.
Create a file in your project called app.rb containing the following:
require 'sinatra/base'

class MyApp < Sinatra::Base

  set :host_authorization, { permitted_hosts: [] }

  get '/' do
    '<!DOCTYPE html><html><body><h1>Hello World</h1></body></html>'
  end
end
The get method is provided by the Sinatra::Base class, from which our MyApp class inherits; Sinatra::Base is available because we load the Sinatra library on line 1.
Self Check Question
What two steps did we take earlier to guarantee that the Sinatra library is available to load in line 1?
We specifiedgem 'sinatra'in theGemfileand successfully ranbundleto confirm that the gem is installed and "lock" the correct version of it inGemfile.lock.
As you see from the above simple example, Sinatra lets you write functions that match an incoming HTTP route, in this case GET '/' (the root URL), a very simple HTML document containing the string Hello World will be returned to the presentation tier as the result of the request.
To run our app, we have to start the application server and presentation tier (web) server. The rack application server is controlled by a file config.ru, which you must now create and add to version control, containing the following:
require_relative 'app'

run MyApp
The first line tells Rack that our app lives in the file app.rb, which you created above to hold your app’s code. We have to explicitly state that our app file is located in the current directory (.) because require normally looks only in standard system directories to find gems.
You’re now ready to test-drive our simple app with a command line:
| Local computer | Docker, Codespaces, or Codio |
|---|---|
bundle exec rackup --port 3000 |
bundle exec rackup --host 0.0.0.0 --port 3000 |
The --host 0.0.0.0 in the right-hand column matters whenever the app runs somewhere other than your own machine. By default the appserver only accepts connections from the machine it is running on, so a container would refuse the request your browser makes from outside it. 0.0.0.0 tells it to accept connections on every network interface.
This command starts the Rack appserver and the WEBrick webserver. Prefixing it with bundle exec ensures that you are running with the gems specified in Gemfile.lock. Rack will look for config.ru and attempt to start our app based on the information there.
To see the webapp:
| Local computer | Docker, Codespaces, or Codio |
|---|---|
Open a fresh browser tab, visit localhost:3000, and verify that you can see “Hello World”. |
Your app is running inside a container or a remote machine, so you reach it through a forwarded port rather than directly. Docker: start the container with -p 3000:3000, then visit localhost:3000 in your own browser. Codespaces: the port is forwarded for you as soon as the server starts, and a notification offers to open it. If you dismissed that notification, open the Ports panel, find port 3000, and click the globe icon to open it in your browser. If port 3000 isn’t listed at all, click Forward a Port and enter 3000. Codio: click the “Box URL” button on the top toolbar, which is pre-configured to point at port 3000. Set it to open in a new browser tab rather than a Codio tab, as the latter doesn’t always work. 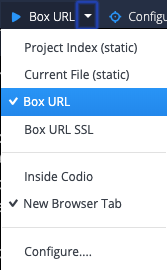 Verify that you can see “Hello World”. |
Self Check Question
What happens if you try to visit a non-root URL such as https://localhost:3000/hello and why? (your URL root will vary)
You'll get a humorous error message from the Sinatra framework, since you don't have a route matching get '/hello' in your app. Since Sinatra is a SaaS framework, the error message is packaged up in a Web page and delivered to your browser.
You should now have the following files under version control: Gemfile, Gemfile.lock, app.rb, config.ru. This is a minimal SaaS app: the app file itself, the list of explicitly required gems, the list of actual gems installed including the dependencies implied by the required gems, and a configuration file telling the appserver how to start the app.
Modify the app
Modify app.rb so that instead of “Hello World” it prints “Goodbye World”. Save your changes to app.rb and try refreshing your browser tab where the app is running.
No changes? Confused?
Now go back to the shell window where you ran rackup and press Ctrl-C to stop Rack. Then start it again with bundle exec rackup --port 3000 (or bundle exec rackup --host 0.0.0.0 --port 3000 in Docker, Codespaces, or Codio), and once it is running, go back to your browser tab with your app and refresh the page. This time it should work.
What this shows you is that if you modify your app while it’s running, you have to restart Rack in order for it to “see” those changes. Since restarting it manually is tedious, we’ll use the rerun gem, which restarts Rack automatically when it sees changes to files in the app’s directory. (Rails does this for you by default during development, as we’ll see, but Sinatra doesn’t.)
You’re probably already thinking: “Aha! If our app depends on this additional gem, we should add it to the Gemfile and run bundle to make sure it’s really present.” Good thinking. But it may also occur to you that this particular gem wouldn’t be necessary in a production environment: we only need it as a tool while developing. Fortunately, there’s a way to tell Bundler that some gems are only necessary in certain environments. Add the following to the Gemfile (it doesn’t matter where):
group :development do
  gem 'rerun'
end
Now run bundle install to have it download the rerun gem and any dependencies, if they aren’t already in place.
Any gem specifications inside the group :development block will only be examined if bundle is run in the development environment. (The other environments you can specify are :test and :production, and you can define new environments yourself.) Gem specifications outside of any group block are assumed to apply in all environments.
Say the following in the terminal window to start your app and verify the app is running:
| Local computer | Docker, Codespaces, or Codio |
|---|---|
bundle exec rerun -- rackup --port 3000 |
bundle exec rerun -- rackup -p 3000 -o 0.0.0.0 |
There are more details on rerun’s usage available in the gem’s GitHub README. Gems are usually on GitHub and their READMEs are usually full of helpful instructions about how to use them.
In this case we are prefixing with bundle exec again in order to ensure we are using the gems in the Gemfile.lock, and the -- symbol is there to assert that the command we want rerun to operate with is rackup -p $PORT -o $IP. We could achieve the same effect with bundle exec rerun "rackup -p 3000 -o 0.0.0.0". They are equivalent. More importantly, any detected changes will now cause the server to restart automatically, similar to the use of guard to auto re-run specs when files change.
Modify app.rb to print a different message, and verify that the change is detected by refreshing your browser tab with the running app. Also before we move on you should commit your latest changes to git.
Git Walkthrough
You’ll keep this work in your own GitHub repository. On GitHub, click New repository, give it a name such as chips-3.7, and create it empty — no README, no .gitignore, no license — so that it doesn’t conflict with the app you just built locally. We will use this as an opportunity to teach you some Git tricks that you’ll be using for the rest of the term.
First, you’ll need to add the GitHub repo as a remote to your local repo. In the GitHub repo, navigate to the green “Code” dropdown and copy the SSH link. Then run this command.
git remote add origin [SSH_LINK]
This will add the GitHub repo to the project as a remote repo named origin, the conventional name for the main remote a repo is associated with. While you could push directly to the main branch of this repo, in order to keep main clean for the final submission, you’ll make a branch locally and on the GitHub remote repo by running the commands below.
git checkout -b chips-3.7
git push -u origin chips-3.7
Working on a branch keeps main deployable while you experiment, and it sets you up to make a Pull Request to finalize your changes before merging back into the main branch, which we’ll provide detailed instructions for in Part 3 of this assignment. In the meantime, as long as you’re on your own branch, whenever you want to update your code you’ll need to git add, commit, and simply git push.
Deploy to Render
Render is a cloud platform-as-a-service (PaaS) where we can deploy our Sinatra (and later Rails) applications. If you don’t have an account yet, go sign up at https://render.com — you can sign up with your GitHub account, which also connects your repos in the same step.
To create your app on Render:
- From the Render dashboard, click New > Web Service
- Connect your GitHub repo (select the repo you created above)
- Give the service a name — this becomes part of your public URL (
https://<name>.onrender.com) - Set the Build Command to:
bundle install - Set the Start Command to:
bundle exec rackup config.ru -p $PORT - Choose the Free instance type and click Deploy
Render will run bundle install, start your app, and give you a live URL. Real-time build logs appear in the dashboard as it deploys.
Note: Free Render services spin down after 15 minutes of inactivity. The first request after idle takes about 1 minute to respond — this is normal, not a broken deployment. Visit your app URL a couple minutes before any demo to warm it up.
Summary
-
You started a new application project by creating a
Gemfilespecifying which gems you need and runningbundleto verify that they’re available and create theGemfile.lockfile that records the versions of gems actually in use. -
You created a Sinatra app in the file
app.rb, pointed Rack at this file inconfig.ru, and usedrackupto start the appserver and the WEBrick web server. -
You learned that changing the app’s code doesn’t automatically cause Rack to reload the app. To save the work of restarting the app manually every time you make a change, you used the
rerungem, adding it to the Gemfile in a way that specifies you won’t need it in production, only during development. -
You versioned the important files containing not only your app’s code but the necessary info to reproduce all the libraries it relies on and the file that starts up the app.
-
You deployed this simple app to Render.